After many years of high under hood temperatures, the Fuel Injection
hoses, while still working acceptably, were becoming brittle in my engine.
Since so many XJ-S owners have had under hood fires due to failure of the
F.I. hoses, this was a good time to replace the original hoses as I was
also in the midst of remaking the F.I. Harness as well.
First, this is really a very simple procedure! Despite what you
might have heard on the Jag-Lovers.org
XJ-S list, regarding
the absolute perfect size of injection hose, the bottom
line (at least on my 1989 Marelli Car) was that an
Aeroqip AN6 hose braided steel hose
is a good application for F.I. hose replacement for this application.
I bought three
feet of it (just right) at my local speed shop for around $14 USD.
 AN6 is roughly 5/8" inside diameter, but not exactly.
The hoses slipped onto the "spruce tree"
connectors fairly firmly (and are very difficult to just "pull off" once on),
but I did not trust them alone to handle the 32 psi
that is present in the fuel rail. By the way, many on the
XJ-S "list" and in "The Book"
refer to a (sharp?) "barbed connector". This seems to imply some sort of sharp
fish hook-like connector on the Fuel rail and injector.
From the picture here (which I stole off another
XJ-S site--sorry! :-/ ) there is nothing sharp or menacing about these barb ends.
You can squeeze them with your fingertips, etc. They do, however,
do a fairly good job of holding the hose on. But...
AN6 is roughly 5/8" inside diameter, but not exactly.
The hoses slipped onto the "spruce tree"
connectors fairly firmly (and are very difficult to just "pull off" once on),
but I did not trust them alone to handle the 32 psi
that is present in the fuel rail. By the way, many on the
XJ-S "list" and in "The Book"
refer to a (sharp?) "barbed connector". This seems to imply some sort of sharp
fish hook-like connector on the Fuel rail and injector.
From the picture here (which I stole off another
XJ-S site--sorry! :-/ ) there is nothing sharp or menacing about these barb ends.
You can squeeze them with your fingertips, etc. They do, however,
do a fairly good job of holding the hose on. But...
Despite what some other Jaguar "experts" said about not
putting clamps around the hose of the barbed injectors, I felt,
as a safety precaution, as well as visual enhancement,
to install Spectre hose clamps with blue anodized aluminium covers.
This tied in nicely
with the aeroquip braided steel fuel lines that were connected to the fuel rail that
is connected to the injectors. They look great and cover the (top) clamps. There
have been no leaks or probelms with this arrangement.
 Use an exacto knife to carefully cut off the old (somewhat brittle)
injector hose. Although the barb connector off the fuel rail and
injectors are all metal, try not to scratch them up.
I had best success first cutting each hose horizontally
in half (i.e. the injectors from the rail), then cutting the hoses vertically
from along the hose in half on one side. Then it was
(sometimes hard, sometimes easy)
to peel the hose of where it connects to it's component.
Use an exacto knife to carefully cut off the old (somewhat brittle)
injector hose. Although the barb connector off the fuel rail and
injectors are all metal, try not to scratch them up.
I had best success first cutting each hose horizontally
in half (i.e. the injectors from the rail), then cutting the hoses vertically
from along the hose in half on one side. Then it was
(sometimes hard, sometimes easy)
to peel the hose of where it connects to it's component.
Another decision--since I was going to be securing these hose ends
with clamps, I decided to discard the little rounded cup caps
at each end of the hose connection. They seem prudent if you are replacing
the hose exactly as stock, but a hassle in this modification.
I also decided to lower the fuel rail (from stock) so that I could later
install a Monte Carlo Bar across the engine bay. (Check back later for details.)
The stock height F.I. rail and low hood line does not provide enough
clearnace for connecting a support bar across the engine bay from the end of the
stock bracing bars going to the firewall. Plus in my never ending quest for
making the engine look more "trick", it looks better than before.
I clamped the braided hose to the end of my work bench, wrapped
the point where I would
cut using electrical tape (to reduce fraying of the braiding) and
used a cut-off dremell-type cutting disk attachment on my electric drill to cut the
F.I. hose to a shorter length (once I measured visually how high I wanted the
new fuel rail to be.) After determining
this length, I cut TEN hoses to this length.
The number 1 cylinders are forward (but not directly underneath) the front end
of the fuel rails and need to be longer than the other 10 cylinders,
so measure those lenghts seperatly. They are different lenghts as well.
 It might be overly obvious, but extremely important to
note here that these 10 hoses must be exactly the same length.
If you look at this picture, attaching the hoses to the rail, then sitting
it down on a flat surface may show slight differences. Mine did--I had
to recut a couple of hoses that were too short. If they are not the same length,
they won't all seat in the intake manifold with the injectors
correctly. Just a heads up.
It might be overly obvious, but extremely important to
note here that these 10 hoses must be exactly the same length.
If you look at this picture, attaching the hoses to the rail, then sitting
it down on a flat surface may show slight differences. Mine did--I had
to recut a couple of hoses that were too short. If they are not the same length,
they won't all seat in the intake manifold with the injectors
correctly. Just a heads up.
While the rail was out of the car, I spent about 2-3 hours polishing
it on the bench polisher with compounds. As you can see, it comes up
to a chrome like finish. If you are willing to keep it up with
metal polish, your rail can look like that too.
Once the 10 "short" hoses are cut, attach them to the rail.
regardless of other opinions, I still went with using clamps
at both ends of the hoses.
You will need 24 hose clamps for the job.
For pure beauty, I added 12 blue anodized aluminium covers (sold
by Summit Racing from their catalog, or any good speed shop) to cover
the clamp where the hose meets the fuel rail. There is not enough
room where the hose meets the injector for a cover. Slip the covers
on before putting on the other hardware (see next.)
Another caution that is a major "gee, why didn't I think of that?" is
don't forget to put the hold down plate on first
before slipping on the injector! (opps...I did that!)
That "barb"
may not look like much, but like a fish hook, once in, it's tough to get out.
(see next)
 Also...the hold down plate is "keyed" to have the injector face forward
facing or backward facing. On my 1989, cylinders 1-3 injectors faced forward,
bur 4-6 faced towards the firewall. When I rebuilt my
Fuel Injection Harness I decided to
have them all point to the back. Just be sure you put your
hold on plate and position the injector to face accordingly.
Another important note: Once you put your FI injectors on
the hose ends, please line them up precisely so that
the connector/key part is facing exactly forward or backward
along the rail (think 9:00 or 3:00 if you are looking at the rail
in the car) The reason is that the hold down plate is
secured by two attachments into the intake manifold and once tightened
down, it is expected that the injectors line up in the plates exactly.
You have been warned! Please don't be a little sloppy like I was
and have to remove the whole unit after tightening these things into the
intake maifold to fix a couple of "9:02" injectors! Frustrating.
[Picture Note: hold down plate, injector rings and intake hold down
plate have been powdercoated bright aluminium color-WE]
Also...the hold down plate is "keyed" to have the injector face forward
facing or backward facing. On my 1989, cylinders 1-3 injectors faced forward,
bur 4-6 faced towards the firewall. When I rebuilt my
Fuel Injection Harness I decided to
have them all point to the back. Just be sure you put your
hold on plate and position the injector to face accordingly.
Another important note: Once you put your FI injectors on
the hose ends, please line them up precisely so that
the connector/key part is facing exactly forward or backward
along the rail (think 9:00 or 3:00 if you are looking at the rail
in the car) The reason is that the hold down plate is
secured by two attachments into the intake manifold and once tightened
down, it is expected that the injectors line up in the plates exactly.
You have been warned! Please don't be a little sloppy like I was
and have to remove the whole unit after tightening these things into the
intake maifold to fix a couple of "9:02" injectors! Frustrating.
[Picture Note: hold down plate, injector rings and intake hold down
plate have been powdercoated bright aluminium color-WE]
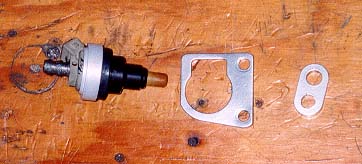
A last important item is to get new rubber ring seals for the
fuel injector tips. Any Jaguar parts house or the dealer can
source them. The Repair and Operations manual says to replace them
whenever you remove the fuel rail and injectors. They look like small
black rubber Cherrios (cereal rings) and fit onto the ends of the
injector tips, forming a seal between the injectors and the intake
manifold. As I had mentioned in the article on my
engine beautification,
put the rubber washers that goes around each injector nozzle
in the indented holes on the intake manifiold first and
then press the fuel
injection nozzles through these into the manifold. I found this to be easier than
putting the seals on the injectors and trying to get them to
seat in the intake manifolds. I had to do this twice before I succeeded.
Once seated in the manifold, another tip
is to begin tightening the screw down bolts
for the mounting plates for the injectors from the center
cylinders outward--not front to back. They will seat better if you do.
The braided steel hose is not only the best you can
buy, but presents a more aggressive
under hood look to the engine.
Therefore, you can be confident that the steel braided Aeroquip
hose meets and exceeds the specs of the stock hose.
And with well attached clamps (one
on each hose end where it connects to the injector and fuel rail), under hood fires
due to F.I. hose failure, can reliably be avoided.
This project has been satisfying for several reasons. The
AN6 steel braided hose not only looks good, but works superbly and
costs less then what I have heard from others for replacing these with
Jaguar part hoses. I'll take that anyday. Better reliability, lower cost,
and killer looks. And it was good to learn more about the car. I am glad
to share this with my Jaguar friends too. If you enjoyed this article
and have not already, would you please sign my
Guest Book and let me know? Thank You.
